 If you’re looking into buying in a home freezer dryer you’ve come to the right place.
Today, freeze dryers are still a fairly UNcommon household appliance. But I’m betting that’s about to change!
I envision a future where nearly every home has a freeze dryer and food waste becomes a thing of the past.
Where everyone can enjoy the incredible benefits of freeze-drying their own foods AT HOME.
And even though it may seem like a huge effort to freeze dry at home, it’s not bad at all.
Once you fully understand how they work and look at all your options, you’ll be ready to invest in this innovative technology.
So today, I’m going to sharing everything I know about freeze dryers, specifically:
As A Way To Introduce You To Skilled Survival, We’re Giving Away Our Family First Food Planning Guide. Click Here To Get Your FREE Copy Of It.
WHAT EXACTLY IS A FREEZE DRYER?
A freeze dryer machine is simply an appliance that removes nearly all the moisture from foods.
There are several important benefits to removing moisture from food (which we’ll get into later), the primary benefit being an incredibly long shelf life.
And when it comes to food preservation, and reduced food waste, it’s all about improved shelf life.
So now that you have an idea of WHAT a freeze dryer is, let’s discuss HOW a freeze dryer works.
HOW FREEZE DRYERS WORK
Before we discuss how freezing drying works, let’s talk about how it doesn’t work!
You see, many people get the process of freeze-drying confused with dehydration.
Why? Because freeze drying and dehydration are two standard food preservation methods. And both methods remove water from food products. That’s why a lot of people mistakenly use the two terms interchangeably.
But there are major differences between dehydrated and freeze-dried food storage. First, let’s briefly discuss dehydration.
The Process Of Dehydration
Modern-day dehydration is a pretty simple process that nearly anyone can do at home.
Food dehydrators circulate hot, dry air across food on open racks. This causes the water to evaporate and the food to shrivel.
The temps are high enough to remove water but not high enough to actually cook the food.
Despite this, you lose many of the vitamins and nutrients in the process. Plus, the taste and texture can often change dramatically.
Raisins, dates, and beef jerky are all examples of dehydrated foods.
The Process Of Freeze Drying
On the other hand, freeze drying is a more complex process. One that involves 3 main steps:
- Freezing
- Lowering pressure
- Removing the moisture through sublimation
The end product is completely different than “dehydrated” foods. Because of this complexity, it takes dedicated, high-tech equipment to freeze dry food.
Like dehydrating, you place food on large open racks to allow for air circulation. But, instead of placing the food in a high temp environment, you load the racks into a vacuum chamber.
Then the freeze dryer lowers the temperature inside the vacuum chamber. To an incredible low temp (around -40deg F).
Once the food is completely frozen, a vacuum pump lowers the pressure inside the chamber. And then the temperature is slowly raised back to normal.
Due to the reduced pressure, the water in the food “sublimes”.
Sublimation is the process where solid ice changes directly into water vapor without ever becoming liquid.
The food gives up its water content without sacrificing texture, flavor, or nutrition.
The bottom line:
IF you’ve seen someone rehydrate an entire lasagna on a backpacking trip (as I have), you’ll start to see the immense possibilities of owning a home freeze dryer!
THE BENEFITS OF FREEZE DRYING
So, if it’s more complex to freeze dry foods, why choose it over dehydrating?
More Moisture Removal
One of the main reasons to remove moisture from food is to prevent the spread of mold and bacteria.
All living organisms need moisture to thrive. So by lowering the water contents, it’s nearly impossible for them to survive.
Most home dehydrators can remove about 90 to 95 percent of the water contained in foods.
By comparison, freeze drying will remove up to 98 to 99 percent of moisture content.
The bottom line:
Freeze drying food removes more moisture. Thus it has a much better shelf life than dehydrated foods.
Much Longer Shelf Life
The lower water content of freeze dried foods allows for a much longer shelf life if stored properly. That’s why it’s considered one of the best non-perishable foods..
Sealed freeze dried meals will keep their texture, flavor, and nutritional value up to 25 years (or longer)!
Better Nutritional Content
Dehydrating food doesn’t change the fiber or iron content. But many of the vitamins and minerals begin to break down at higher temps.
Freeze-dried foods keep more of these valuable vitamins and minerals.
More Appealing Appearance & Composition
For most people, the biggest hurdle for dehydrated foods is taste and texture.
Freeze dried foods keep the shape and color of fresh food. You can often rehydrate the food back to a similar original consistency!
For example:
Freeze-dried strawberries become soft again if you add a little water or place them in your mouth.
Lower Weight
The greater reduction in water content provides an extra reduction in weight.
This is great when you have to pack your food on your back for miles and every ounce counts!
Less Cooking Time & Effort
Freeze-dried foods generally only need the addition of water to reconstitute them. Unlike the slow simmer you have to do with dehydrated foods.
Depending on what you’re preparing, most freeze-dried foods will be ready to eat in less than 5 minutes.
This makes meal prep faster and easier for everyone – especially if backpacking or camping.
As A Way To Introduce You To Skilled Survival, We’re Giving Away Our Family First Food Planning Guide. Click Here To Get Your FREE Copy Of It.
THE DISADVANTAGES OF FREEZE DRYING
Of course, there are some serious drawbacks to freeze drying foods.
Higher Freeze Dryer Price
Honestly, this IS the biggest factor for most people. But it’s a shame…
I get it, a food dehydrator can come in at under $50 – and they show up frequently at Goodwill.
By comparison, even a smaller model home freeze dryer can cost more like $2000!
And on top of that, a freeze dryer will use electricity to operate. Energy costs can add up if you run it full time during the summer when fresh produce is rolling in from the garden.
But here are three ideas to make the cost of a freeze dry machine much more palatable.
1. Get a group of friends to “co-own” a home freeze dryer.
You could become a part-owner with friends or neighbors! Then you could share the freeze dryer for different parts of the year.
If you could find 4 other “investors” you all could own a $2000 freeze dryer for about $500. Much more reasonable if you’re on a tighter budget.
2. Start a small freeze-drying business
Consider a home freeze dryer as a small business adventure!
- You can loan the unit out to others for a set time frame…
- Or you could take other people’s foods and freeze dry it for them.
- Or sell freeze dried meals you pack yourself.
Customers could start off as friends, then neighbors. After that, you could consider farmers’ markets or even online sales.
3. They’ll pay for themselves if you compare to the cost of store-bought freezed-dried foods
Another way to justify the expense is the compare the cost to buy an equivalent amount of freeze dried food from the store.
With $2000 you can get about 295,000 calories worth of store-bought freeze dried food. For a typical family of four (1500 calories per person per day) that’s only about 1.5 months worth of emergency food.
On the other hand, with a home freeze dryer, you can freeze and store all your leftover, or bulk discount food purchases, or extra garden produce this year, next year, and on and on.
So if you use your freeze dried all the time, you end up saving money over time when you compare the cost of purchasing freeze dried foods from a store.
The bottom line:
By taking any of these approaches you could help justify the upfront cost of buying a freeze dryer. And if you use it as a small business venture your new freeze dryer investment could even turn a nice profit!
Fixed Process Volume
I’ve expanded my old reliable dehydrator 4 times. It now has many more drying racks than it did when I bought it.
This has given me a huge increase in the volume of food I can preserve.
Volume expansion is not as easy with a freeze dryer. This is because the food has to fit in a smaller vacuum chamber and each run can take days to finish.
KEY FEATURES TO LOOK FOR IN A FREEZE DRYER
If you’ve made the decision to get a freeze dryer, you still need to ask some key questions before investing:
How much food do you need to preserve?
Most freeze dryers give stats on the size of the vacuum chamber and the amount of food that can fit in one batch.
If you plan on smaller batches (i.e. you’re only “cooking” for yourself and a partner), you can get away with a smaller dryer.
If you need to provide for a crowd or you plan to do more than one food type in a batch, you’ll likely need a larger dryer.
How much space do you have for a large appliance?
Just like any other appliance, a freeze dryer takes a lot of space. Plus the vacuum chamber, the control system, and pumps add to the footprint.
Some smaller freeze dryers can fit on a countertop, but the large ones are roughly the size of a dishwasher.
How much electricity can you provide for the freeze dryer?
The large pump and other machinery involved in a freeze dryer can take some serious power.
For the larger models, you may need to have a dedicated electrical circuit.
What maintenance are you willing to do?
Most home freeze dryers are fairly low maintenance. But they do need cleaning and inspecting the door seals and other critical parts.
Also, most come with a vacuum pump that requires oil changes on occasion.
Some allow for an upgrade to an oil-free pump, but it comes at a premium.
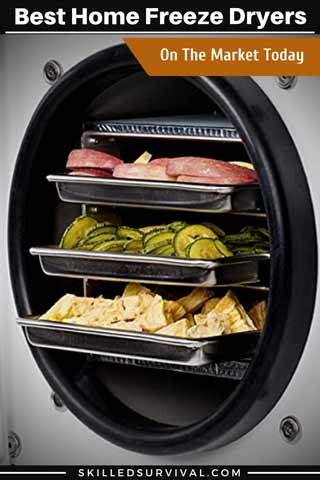
BEST FREEZE DRYER(S) ON THE MARKET TODAY
When it comes to home freeze dryers, there’s really only one name on the market these days – Harvest Right.
Other manufacturers make solid, well-built freeze drying machines. But most of these units are for the industrial market instead of for “in-home” use.
These commercial units do occasionally come up for sale on auction sites. And a used commercial freeze dryer can be a GREAT deal if you find the right one for your uses.
For the rest of us, there are three models from Harvest Right (small, medium, large). All three units are essentially the same except for their dimensions and price.
But all three sizes have several color options to choose from, to help match any kitchen decor.
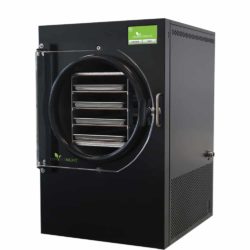
Small Harvest Right Freeze Dryer
 The Small Harvest Right Freeze Dryer is an ideal unit for someone just getting into at home freeze drying.
It can freeze dry anywhere from 4-7 LBS of fresh food per batch which can translate into about 840 LBS of fresh food annually!
The size of the Small Harvest Right Freeze Dryer is 25 inches tall, 16.5 inches wide, and 18.5″ deep.
If you’re hoping to buy a freeze dryer than can fit on a kitchen countertop, this is the only unit I know of that can do it.
But even then, it is still a fairly large appliance for a countertop. Be aware of your headspace and depth to ensure it will fit – if this is your goal.
Check Out Today’s Price and Features
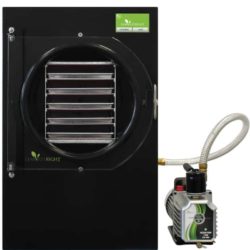
Medium Harvest Right Freeze Dryer
 The Medium Harvest Right Model can take up to 7 to 10lbs of fresh food per batch.
This is a decent amount of volume while not requiring the dedicated circuit that the Large unit may need.
The dimensions of the medium unit are 28.5 inches tall, 18 inches wide, and 21.25 inches deep.
It’s a good compromise on price, size, and capacity.
Check Out Today’s Price and Features
Large Harvest Right Freeze Dryer
 Finally, Harvest Right makes a large at home freeze dry.
This larger unit can freeze dry up to 16 LBS of fresh food per batch.
This helps to drastically cut down on the number of batches you need to run!
However, this unit needs quite a bit of floor space. Its dimensions are 30.75 inches tall, 20.25 inches wide, and 23.75 inches deep.
So if you’re looking to invest in a home freeze dryer to start a small business venture, this is the best unit for you.
Check Out Today’s Price and Features
As of now, these are the 3 main choices freeze dryer choices for at-home freeze drying…
I’m hoping the market grows in the next few years to add some much-needed competition. I’d love to see new features and innovation – as well as a price drop.
But until then, the handy and frugal DIYer can always build their own freeze dryer!
HOW TO BUILD A DIY FREEZE DRYER
Yes, it IS possible to build your own DIY Freeze Dryer, but it’s also challenging. This is not a project for those who are new to DIY.
And you’re not likely to match the same level of quality as a commercial version, but you can’t beat the price…
Here’s an excellent DIY Freeze Dryer build you can try to follow step by step (if you’re up for the challenge):
BEST FOODS TO USE IN A FREEZE DRYER
While the manufacturers state nearly any food can be freeze dried, that’s not quite accurate.
Many foods freeze dry very well, but some need a bit more pre-processing first.
Here’s a video that provides a nice overview of using a freeze dryer at home:
Now that you have an overview, here are some more freeze dry preparation details for different food types.
Fruits and Veggies
Small fruits and vegetables (blueberries, beans, etc.) can be freeze dried in one piece. But you’ll need to cut larger items into smaller slices or chunks.
I’ve heard that freeze dried watermelon is fun. With the look and taste of watermelon, but the crunch and weight of rice cakes!
And the only way you’ll eat vegetables on a backpacking trip is if they’re freeze dried.
Meats
This same principle also applies to meats. Stewed meats freeze dry well, but large thick steaks are far more challenging.
Cook all meats before drying. The rehydration process may not involve adequate heat to cook it later.
Coffee
How did you think they fill those packets of instant coffee crystals?
Meat
Not jerky, but superlight chunks of steak ready to be added to dinner in a flash!
Fish and Seafood
Freeze dried shrimp feels like they should be fake, but they rehydrate to add to soups and burritos!
Eggs
Real scrambled eggs on day 9 of a trip? That’s a treat.
Dairy
Dried milk powder is a staple in some places. This makes it possible to keep a large amount of milk on hand without it spoiling or taking up the whole fridge.
Freeze dried butter powder is an amazing find that has made my camp cooking SO much better!
FINAL THOUGHTS
Freeze drying food is a great way to add some variety and long term shelf life to your emergency supplies.
The simple cooking and lightweight make these easy foods to manage. Plus the taste, texture and nutritional improvements go a long way to enjoying foods for the long term!
No matter what the future holds…
Jason K.
P.s. Do you know where the closest nuclear bunker is from your home?
There are a lot of natural nuclear shelters in the US that are absolutely free. And one of them is near your home.
Click here to see the Closest Natural Nuclear Bunker to Your Home?

Click on the image above to find out where you need to take shelter.
The post Best Home Freeze Dryer On The Market Today – 2019 appeared first on Skilled Survival.


 mountain bike on single track, I would not want this much tire. Really fat tires would be heavy and hard to push around on a normal bike but the traction from the fat tires bring is insane, and makes you feel much safer on the mountain. With this being an
  hanging over the tailgate using a
 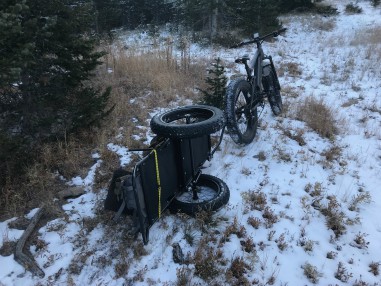 you do have to watch out for larger rocks on the trail with the
  morning we saw 3 elk walk into a pasture on the backside of a mountain at 10,500 feet. Without the QuietKats this would have been a painful journey and getting an elk here would have made for a long day of packing meat out with at least one extra trip up the mountain. With the QuietKat & trailer, just one trip down the mountain, elk & gear.