No products in the cart.
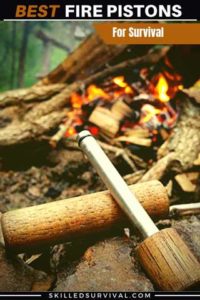
Best Fire Pistons You Can Count On In A Pinch

Today We Will Go Over An Incredible Fire-Making Tool, Fire Pistons
When it comes to survival skills, making fire is one of the most important.
Fire gives us the ability to:
- Keep warm and dry,
- Cook food and sterilize water
- Make signals during the day and at night
Humans also show a psychological boost from fires. This moral booster can help to increase your odds of surviving an emergency.
With all these benefits, it’s easy to see why we spend a lot of time (and money) to ensure we can always make a fire.
Today, there are hundreds of tools designed to ensure your fire-making skills. Tools range from survival lighters to solar mirrors.
They each have their benefits and drawbacks. Some firestarters are better suited to certain situations than others.
Most experienced adventurers plan on carrying at least two different firestarters. A primary and a backup, just in case.
But what did people do before all our modern technology made fire so simple?
Our ancestors didn’t have access to mass-produced plastic lighters. They also didn’t carry boxes of waterproof matches or have Ferro rods.
So if your primary source of fire is a bow drill, what can you carry for backup?
A fire piston is a smart option.
Here’s an awesome video showing a slow-motion fire piston in a transparent cylinder:
↓ Fire Piston Demonstration: Phantom Flex Slow Motion ↓
So today, we’re going to cover the following topics related to the fire piston:
-
Best Fire Pistons On The Market Today
-
What Is A Fire Piston?
-
How A Fire Piston Works
-
How To Use A Fire Piston
-
Best Tinders To Use With A Fire Piston
-
How To Make A Fire Piston
Are You Ready For The Tough Times Ahead? Take My 60 Sec Quiz To See If You’re Part Of ‘The Fragile Masses’ Or Not… Start Quiz Now!
Best Fire Pistons On The Market Today
Let’s now take a look at a few of the best fire pistons on the market today.
I want to show you various types, styles, and prices to choose from:
1. Our Top Recommendation
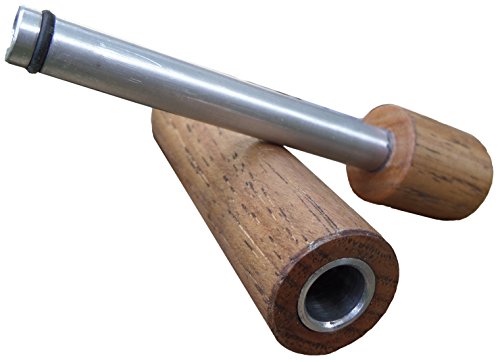
Campfirepiston Hickory Fire Piston
This is a very nice-looking model with a wooden handle that saves your hands. Especially when compared with the knurled grips of other fire pistons.
The aluminum inner cylinder and piston are well constructed and should stand up to years of use.
Plus, the hickory outside makes this one a great survival gift to show off to your friends.
We earn a commission if you make a purchase, at no additional cost to you.
↓ Hickory Fire Piston Review ↓
2.

PSKOOK Metal Fire Piston
This fire piston is very compact, but that comes at the price of ease of use.
The small handles make it harder to grip and less stable during use.
However, the small size makes it easier to pack and lighter than other models.
Also, the dual o-ring seal ensures no air escapes, helping maximize your chances of success.
We earn a commission if you make a purchase, at no additional cost to you.
↓ PSKOOK Fire Piston, A True Ancient Technology Tool! ↓
3.

Wilderness Solutions Scout Fire Piston
The Scout Fire Piston is manufactured from a space-age polymer and features an aluminum piston shaft.
It also comes with some char-cloth and a spare O ring.
Finally, it has a LIFETIME WARRANTY.
They will repair or replace any product that fails to perform for any reason.
We earn a commission if you make a purchase, at no additional cost to you.
↓ Wilderness Solutions FireStarter Fire Piston ↓
4.
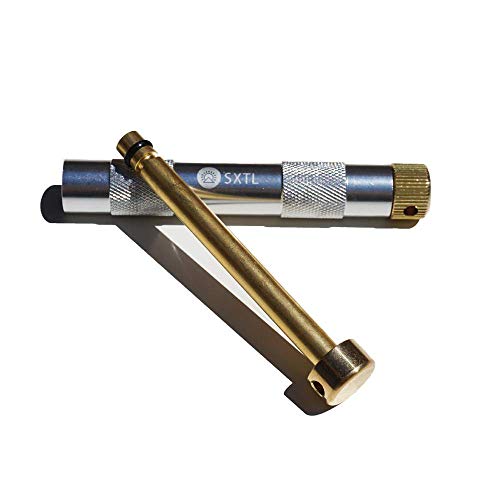
SXTL Fire Piston Kit with Char Cloth
This kit comes with all the parts and accessories you need to start a fire.
This piston head is made of copper and the chamber is made of aluminum. This combination of metals makes for a very durable design.
The kit comes packaged in a tin box that you can easily slip into your backpack or toolbox, ideal for camping or backpacking.
We earn a commission if you make a purchase, at no additional cost to you.
↓ SXTL Fire Piston Fire Starter Instruction | Review ↓
What Is A Fire Piston?
The fire piston is a proven fire-starting device that’s been around for hundreds of years.
It is also referred to as a fire syringe or a slam rod fire starter.
Fire pistons use the fundamental laws of physics to heat and ignite a small piece of tinder. A small piece of tinder can light a tinder bundle or fine kindling to start a fire.
The design is simple – there are only two parts!
- a hollowed-out cylinder
- and a piston rod
The first is a hollow cylinder with a smooth interior and one sealed air-tight end.
The cylinder size can range from a few inches in length and less than 1/2” wide to the size of a bicycle tire pump.
The second part is a piston rod that’s a fraction smaller in diameter than the cylinder. It’s also about an inch longer.
The piston rod includes a small cavity for the tinder to sit. It also has an airtight O-ring seal on one end and a comfortable handle on the opposite end.
These parts can be made out of nearly any material. However, metal and plastic are the most common nowadays. That’s because they allow for incredibly smooth surfaces.
Smooth surfaces are essential for a very tight seal between the two parts. The piston rod must be tight to the cylinder walls to prevent air from escaping.
This tight tolerance between the cylinder and the rod is what creates the magic of the fire piston.
As A Way To Introduce You To Skilled Survival, We’re Giving Away Our Ultimate Survival Gear Checklist. Click Here To Get Your FREE Copy Of It.
How Fire Pistons Work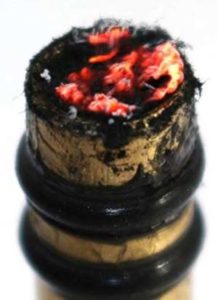
A fire piston works on the principle of the Ideal Gas Law.
If this sounds familiar, it’s because you heard about it in high school chemistry or physics class.
The Ideal Gas Law defines the relationship between pressure, volume, and temperature.
The basic premise is this:
For a given amount of a gas (i.e., air), quickly compressing it to a smaller volume results in a dramatic increase in both pressure and temperature.
In the case of a fire piston, this can result in a spike in the air temperature of over 400deg F.
Plenty of heat to instantly ignite a fine piece of tinder without a spark!
If this seems far-fetched, it’s not. It’s the same law of physics that allows diesel engines to work.
↓ How To Use A Fire Piston ↓
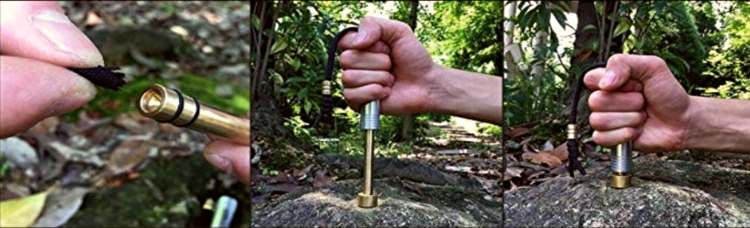
How To Use A Fire Piston
Using the fire piston is simple in concept but takes some practice to master.
↓ Black Scout Tutorials – The Fire Piston ↓
First, take the time to create a nest of tinder and small kindling.
This is where you’ll put the ember produced by the piston once it’s lit.
So make sure it’s easy to reach and have all the fire fuel at the ready before you begin.
There’s nothing worse than running out of fuel just as your fire starts to take off.
Next, place a small amount of tinder in the cavity on the front of the piston.
Don’t pack it in there, as it needs exposure to air to heat and combust. If you pack it too tightly, it’ leaves no room for air to comingle with the tinder.
Start the piston into the cylinder, but don’t compress it too far. Just enough to hold it in place should be fine.
Brace the cylinder against a solid object and grab the handle end of the piston.
Now, quickly push the piston in, compressing the air and (hopefully) lighting your tinder.
Once you’ve compressed the air, it’s important to quickly get it out of the cylinder.
The tinder needs immediate fresh air – before the oxygen is consumed and the ember dies out.
So as soon as the piston reaches the bottom of the cylinder, pull it back out just as rapidly.
So in and out FAST!
Now work quickly to transfer the tiny ember on the piston’s end into the fine tinder’s nest. Once it’s transferred, gently fan it (or blow on it) to encourage the flames to grow.
If you’re successful, work your way up to larger kindling and fuel to build a roaring fire.
Practice all these motions until they’re smooth and consistent. Soon you’ll master it and increase your efficiency and success.
As A Way To Introduce You To Skilled Survival, We’re Giving Away Our Ultimate Survival Gear Checklist. Click Here To Get Your FREE Copy Of It.
Best Tinders To Use With A Fire Piston
While the fire piston can reach high temperatures, it can only maintain them for a very short time.
This means that easily lit tinders work best.
Fine cotton and dryer lint both combust with ease. However, they burn too quickly and produce no usable embers.
By contrast, char cloth and fine bark fibers light with ease.
And this tinder burns more slowly and allows you time to remove the ember from the piston and use it to start a fire.
You can make char cloth by burning denim or cotton cloth in a closed metal container with limited oxygen.
I use a metal breath mint container with a pinhole vent.
↓ How To Make Charcloth! ↓
How To Make A Fire Piston At Home
Like most tools in this world, you CAN do it yourself if you have enough ingenuity, skill, and patience.
They’re fairly simple tools to build once you understand the principles behind them.
It also doesn’t have to cost much money (but it will cost some “time”).
Watch this video to learn how to make a fire piston for just 1$:
↓ Slam Rod Fire Starter – Ignition By Air!! ↓
And here’s another good video on how to make a fire piston and some char cloth to go with it:
↓ Making A Fire Piston And Char Cloth ↓
Final Thoughts
Nothing is going to replace a survival lighter as a primary firestarter. Sorry, it’s just too cheap, easy to use, and readily available.
But I must admit a fire piston is an exciting and reliable way to start a fire!
It does take practice to master, which I found both fun and challenging.
I like the durability of the build and the lack of moving parts.
There are no batteries and no fuel to run out. This means it’s a fantastic long-term option that doesn’t rely on modern technology.
For most people, it’s an ideal backup firestarter. And for anyone into survival or self-reliance, it’s an excellent primary firestarter.
All in all, the fire piston is worth checking out. Can you ever have TOO MANY ways to make a fire? I don’t think so.
Jason K.
P.s. Are you ready for the tough times ahead?
Find out now by taking my short Readiness Score Quiz – it’s absolutely free.
Once complete, you’ll know exactly where you stand on the “fragile” vs.” resilient” spectrum.
So click here to start the Quiz….And don’t worry; the questions are so easy a 3rd grader could answer them.
Click on the image to begin the Quiz and find out once and for all if you’re part of “The Fragile Masses” or “The Resilient Few.”
The post Best Fire Pistons You Can Count On In A Pinch appeared first on Skilled Survival.


 In the book, “