 If you’ve been contemplating getting a tent heater – you’re in luck…
Never before have there been so many options.
I’ve personally invested in a tent heater and you SHOULD too.
It will make your offseason camping experience 10 times better!
So today I’m going to teach you everything I know about tent heaters, specifically:
As A Way To Introduce You To Skilled Survival, We’re Giving Away Our Ultimate Camping Essentials Checklist. Click Here To Get Your FREE Copy Of It.
WHAT EXACTLY IS A TENT HEATER, ANYWAYS?
If you’ve never considered a tent heater, you’re not alone…
Most people have discovered that using a heater in a confined space can be very dangerous. So they never research tent heater solutions.
Heaters that are specifically designed for use inside a tent.
They’re efficient, portable, and much safer to use than past portable heaters.
And depending on the model, they can be fueled by propane or butane cylinders.
Or even from a battery pack or extension cord for electric heaters…
Tent stoves are also a special type of tent heater but we will not be covering tent stoves in this article. Why? Because we wrote a separate post dedicated to tent stoves.
So if you’re interesting in getting a tent stove instead of an electric or gas tent heater, click here.
 6 REASONS WHY YOU SHOULD GET A TENT HEATER
1 – Extra Comfort
First off, nothing ruins a fun camping trip more than shivering all night long in a frigid tent.
In the past, the thought of winter camping in a tent didn’t sound like a good time.
But not anymore!
A good tent heater opens up a whole new world of camping comfort in cooler seasons.
2 – Expanding Your Camping Season
With a tent heater, you can extend your camping season into the late fall and early spring.
OR with the right gear, even extending your camping season to YEAR around!
It just takes a certain confidence in your equipment and your survival skills to head out into the snow for the night.
Sure, a high-quality sleeping bag (or bivy sack) and 4-season winter tent are also crucial. But they’re not always enough for the coldest conditions.
But with a tent heater, you can even extend your camping season well beyond the summer months.
3 – Camping For FREE
Many of the most expensive camping spots “close” in the late fall, winter, and early spring.
But while these facilities may no longer have all the same amenities – they are often not locked behind a gate.
So you can just pull up – choose any open site without paying for a reservation.
4 – Empty, Peaceful, Quiet Campgrounds
If you want to camp in premier campgrounds without the crowds – then cooler seasons are your best friend.
Many of these campgrounds stop taking reservations and become first-come, first-serve.
Why? Because there’s very low demand. Most people never consider camping in cooler months.
For example, in the past, I’ve been the only person in a campground near Leadville Colorado in late October – on a weekend!
So if you enjoy quiet, isolated camping without having to go backpacking – start camping in the cold.
5 – Choice Of The BEST Sites
In the busy summer months, you have to reserve a site in a popular campground at least 6 months in advance…
And you’re lucky if you get a crappy site with no views and no flat surfaces to pitch your tent!
However, if you do in the winter you can often snag the BEST sites in the BEST campgrounds ANYTIME.
It’s why I’m a huge fan of cold season camping.
6 – Avoid Buying Expensive Winter Camping Gear
Most hardcore winter campers have never considered adding a tent heater to their winter camping gear.
Traditionally, they’ve relied on more insulated versions of their summer camping staples.
For example, instead of a lightweight sleeping bag, they carry a 0-degree down bag.
Instead of a breezy backpacking tent, they buy a 4-season winter tent. One with great insulation properties and a heavy-duty waterproof rain fly.
These campers also know the power of good winter boots with warm liners, down jackets and insulated pants. And have learned to wear thick gloves and warm socks (even at night).
All these “upgrades” can be expensive and still leaves you camping in the cold.
The bottom line is: adding a tent heater is a camping game changer!
As A Way To Introduce You To Skilled Survival, We’re Giving Away Our Ultimate Camping Essentials Checklist. Click Here To Get Your FREE Copy Of It.
BENEFITS OF INVESTING IN A NEWER TENT HEATER
There are many benefits to having a tent heater, here are a few of the BEST benefits:
Push Button Comfort
A tent heater is designed to help keep you warm by adding heat.
Even the warmest down jacket doesn’t create any heat on its own. They only help retain the heat your body is losing to the cold air.
This means the only way to warm up is to perform activities that force your body to work out.
This can be hard to do if you’re stuck in a tent for days with bad weather.
By contrast, a tent heater generates heat using electrical power or gases.
This allows you to warm up beyond what your body could do alone.
Tent heaters generate on-demand heat without effort on your part.
Better Safety Features
Modern tent heaters are a much safer option than the old space heaters your grandparents owned.
Many have extensive safety features built into the design, such as:
- Tip-over switches – in case it’s accidentally knocked over
- Overheating protection – which shuts the heating element off before it reaches dangerous temps.
Propane and butane fueled tent heaters also frequently include carbon monoxide/dioxide sensors.
- And some include low oxygen sensors to prevent the build-up of exhaust gases in a small space. These sensors shut down the fuel source if dangerous air conditions are present. Which is especially important when the tent is closed up tight to keep out the cold.
Extreme Portability
Most tent heaters are very portable. They’re made to be lightweight (not backpacking light, but well under 20lbs).
They’re self-contained and often can be carefully re-positioned even during operation.
“Fuel” Efficient:
A good tent heater doesn’t do much good if it burns through all the fuel or battery charge on the first night.
An efficient heater helps conserve energy. This reduces the amount of fuel or batteries you’ll need to take with you.
While there are a lot of benefits to a tent heater, they’re not for every situation.
The extra fuel or batteries needed can often be a major deterrent for longer, unsupported trips.
And, if the conditions aren’t too frigid, you may be able to get by with some better winter camping gear alone.
SIDE NOTE: As a side-effect of the low-oxygen switches, some heaters won’t work at high altitudes.
The low oxygen levels found above 6000ft can confuse the sensors. It may cause them to shut down prematurely, even if there’s no build-up of exhaust gases.
I’ve used my Mr. Buddy Heater at 8160 feet in Rocky Moutain National Park with no issues!
But, typically anything closer to 9,000 ft (or higher) and you’ll run into issues with keeping it lite.
HOW TO CHOOSE THE BEST TENT HEATER FOR YOU
As with any piece of outdoor gear, there are tons of options available from a wide range of brands.
There are many factors to contemplate to ensure any tent heater you select will meet your needs.
Two Main Types Of Fuel Options
There are two main “fuel” types for portable tent heaters: electric and gas.
Electric
Electric tent heaters have many benefits.
First, they generate absolutely ZERO toxic emissions. Which equals clean air and less worry about suffocation dangers.
But they’re not always the best option.
In a campground with service hookups, a corded electric model works well. But for most situations, a battery-powered heater is your only real option.
Unfortunately, the selection of battery-powered heaters is very small. And their heating capacity is limited.
So they are not the best solution for most.
Propane/Butane
Tent heaters fueled by propane or butane gas canisters are far more common than electric.
These fuels are cleaner burning than other options such as white gas or kerosene. And they tend to have fewer complications when used in an enclosed space.
Also, it’s easy to find fuel in portable canisters. The energy density of these gases means you can carry and resupply fuel for extended trips.
The Size Of Your Tent Matters A LOT
Next, you should consider the size of the space you want to heat up.
A 2-person tent will heat up faster than a huge canvas wall tent meant to sleep 10 people.
So be sure to choose a heater with an output that matches the space of your tent.
We measure heat output in BTUs (British Thermal Units). This is the amount of energy needed to heat one pound of water by one degree F.
You can use this formula to calculate the heat output needed for your tent:
Measure the space’s dimension to determine cubic feet (Length x Width x Height = Cubic Feet).
Next, subtract the outside temperature from the desired inside temperature. This is your desired temperature increase.
If you measure temperatures in Fahrenheit, calculate the required BTUs with this formula:
- Cubic Feet x Temperature Increase x .133 = Required BTUs
If you measure temperatures in Celsius, calculate the required BTUs with this formula:
- Cubic Feet x Temperature Increase x .2394 = Required BTUs
Matching Your Heat Output Needs
A typical home furnace might have a BTU output in the 100,000 range. But a small tent heater only needs to heat a fraction of that space.
A heater rated to 5,000 BTU is usually more than enough for a tent.
If you get a heater with fine-tune BTU controls you can adjust the proper temperature level.
This provides a wider temperature range and control.
Getting A Unit That’s Durable Enough For Extreme Conditions
If you depend on a tent heater as part of your cold-weather camping setup, you need it to work every time.
That’s why durability is such a key factor to consider for such a crucial piece of gear.
Quality materials, clean construction, and attention to detail are all good signs. But be sure to read plenty of reviews before making a purchase.
Also, consider the brand reputation and support before making a final decision.
Along with these indicators of durability, it’s always best to buy from a reputable company.
This helps ensure your heater is the original designer. Not a cheap knockoff version, who may cut corners to reduce costs.
6 BEST TENT HEATERS ON THE MARKET TODAY
Here are the best tent heaters for winter camping, based on the size of the tent:
Best Heater For The Small Tents
We’re going to look at a couple of small heater options that are perfect for small tents. For small tents, a large heater would be overkill.
1 – 750W/1500W Ceramic Space Heater Portable Electric Heater

 This small but mighty space heater can work for both small and medium-sized tents.
It has three settings 1500-watt high heat, 750-watt low heat, and normal cool blow fan.
It also includes safe with both overheat protection & tip-over protection.
But how well can it heat a tent? First, let’s convert the Watts into BTUs, I’ll use this simple online calculator to do that.
- 750 W = 2559 BTUs
- 1500 W = 5118 BTUs
Now using the equations we provided above, using 2559 BTUs and a 40F degree temperature rise. This heater will work with a 481 cubic foot tent space.
For example – that’s a tent a bit over 7ft wide by 7 ft long and 7 ft tall. Nice. But this comes at a very large power cost!
Here’s a chart showing us what we’re up against without grid power…
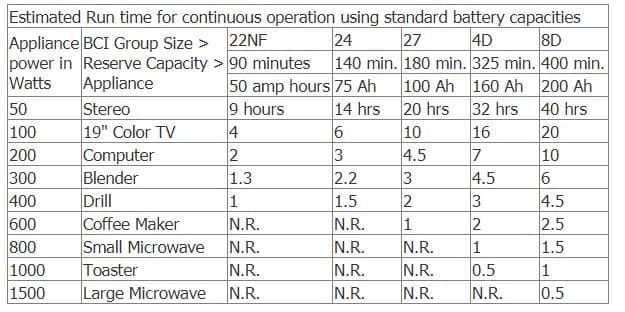
8D is one of the biggest and best deep cycle batteries you can buy. And at 750W of power draw, it will only last about 2 hours!
To provide heat for 5 hours with batteries, you’d need at least 3 deep cycle batteries at over $300 each. Plus, you’d need an inverter to convert the DC battery power to usable AC power at over $100.
The cost and complexity of batteries and inverters quickly make this electric heater a “NO GO” for anything but grid power camping! Otherwise, you’ll need to look to gas-powered heaters.
Check Out Today’s Price

 The Texsport Portable Propane Heater is the lightest one we found at about 1 pound but still produces up to 2,890 BTUs!
It’s also very a durable stainless steel burner, so it won’t easily break.
It includes an auto shut off valve shuts off fuel if the flame goes out but it doesn’t come with low oxygen shut off. That can be good or bad…depending on how you look at it:
- Bad, because if you use this inside a tent it MUST be very well ventilated and don’t use it while sleeping!
- Good, because it will work even at high elevations.
Finally, it has a large fold-away paddle plastic foot you add to the propane canister to provide greater stability.
Check Out Today’s Price
3 – Mr. Heater Portable Little Buddy

 This is one of the smallest and lightest tent heaters specifically designed for INDOOR use on the market today.
But don’t let its small size fool you. The Mr. Heater Portable Little Buddy is a champ in extremely cold weather.
It’s capable of up to 3800 BTUs and is a great choice for a small tent. It uses common 16oz propane canisters, which last for up to 5 hours.
If you need longer heating, you can use an adapter and hose to connect to standard BBQ canisters.
Low oxygen sensors and an automatic tip-over shutoff switch make this a safe choice.
And the rugged design means that you can count on it to function when you need it most.
Check Out Today’s Price
Best Heater For Medium Tents
4 – Mr. Heater Buddy

 This Mr. Heater Buddy tent heater can pump out 4,000 OR 9,000-BTUs. This is ideal for spaces up to 225 square feet.
However, due to the low oxygen shutoff switch, it may not work at altitudes over 7,000 FT.
It also includes a tip over auto shut-off switch.
Fuel Consumption/Burn Rate (Gal/Hr) at 4000 BTU = 0.044 Gal/Hr, at 9000 BTU = 0.099 Gal/Hr
It has a smart designed fold-down handle, a swivel-out regulator or it can connect to a propane tank with an adapter kit.
Estimated run time on a 16oz. propane canister (at Max BTUs) is about 3 hours.
Note: this is the exact tent heater I purchased for my late season camping trips in the rocky mountains.
Check Out Today’s Price
Best Heater For Larger Tents
5 – Mr. Heater Big Buddy

 The Mr. Heater Big Buddy Heater is a much larger version of the same technology in the Little Buddy.
This Big Buddy radiates heat at different levels (4000 to 18000 BTUs per hour). These rates options mean you’ll be able to heat all but the largest cabin-sized tents.
At around 12lbs, it’s fairly lightweight for the amount of heat it produces. And the built-in handle makes moving it around camp easy.
Check Out Today’s Price
Best Heater For Massive Event Sized Tents
6- Zodi Outback Gear X-40 Tent Heater

 This tent heater is hard to find, but the Zodi Outback Gear X-40 is a beast of a tent heater.
It’s built to sit outside the tent!
It draws air from the tent, across a heat exchanger, and back into the tent via a pair of insulated ducts.
This means that the exhaust gases are all outside!
Reducing (and pretty much eliminating) the chance of any dangerous gas buildup.
It can provide a huge 40,000 BTU boost to your tent. Making it possible to heat even large wall tents. Even massive canvas tents you see at events (like those found at outdoor weddings).
But it comes at a high price – both in purchasing the unit and in propane needed to operate the heater.
But if you’re faced with the challenge of keeping a large group of people warm in frigid temps, this is your best option.
Check Out Today’s Price
As A Way To Introduce You To Skilled Survival, We’re Giving Away Our Ultimate Camping Essentials Checklist. Click Here To Get Your FREE Copy Of It.
HOW TO SAFELY USE A TENT HEATER (safety tips)
Bringing a tent heater along on your next camping trip can be a huge relief.
Instead of canceling a trip – you can go enjoy camping even in the bitter cold. But it also comes with life and death safety considerations.
You MUST understand ALL the safety guidelines and follow them exactly.
Here are some tips:
Electric Heaters Are Safer
Electric heaters have their drawbacks in both their output and heat capacity. But they outperform gas-fueled heaters in one very important factor: Safety.
Electric heater DO NOT depend on combustion for heat. So, they don’t create carbon monoxide/dioxide while in use. Nor do they consume oxygen from the air inside your tent.
This means they don’t need the same ventilation that a gas-fueled heater would.
A switch malfunction or incorrect setup won’t result in suffocation and death.
But they can still create a fire if the heating element touches any combustibles.
SO Keep Clear
ALL tent heaters (electric/gas) get very hot during use, even if they do not create an open flame.
So keep all potentially flammable objects clear of the heater. Items such as the tent walls, your sleeping bags, spare clothes, EVERYTHING!
Vent Gases
All gas-powered heaters create carbon monoxide and carbon dioxide as byproducts of combustion.
These toxic gases can build up inside the tent and become very dangerous.
All heater instructions will specify exactly how much ventilation is necessary.
Always err on the side of being overly cautious and allow fresh air into the tent and exhaust gases to escape.
Don’t Fall Asleep
While it’s tempting to fall asleep with the heat on, it’s too dangerous to leave a heater running while you sleep.
It doesn’t take long for the heater to warm up the tent in the morning, so be sure to turn off the heater before you head to bed.
Some people do run their heaters when sleeping.
We DO NOT recommend doing this. The downside risk is not worth it.
But if you choose to ignore our advice, make sure to invest in a separate carbon monoxide detector.
Here’s a video on someone who does sleep with their tent heater unit running. It also “proves” that it’s possible – but again, to me, it’s not worth the risk!
FINAL THOUGHTS
A quality tent heater is a simple way to make winter camping more enjoyable.
For those of us who are resilient, it feels a little like cheating to turn on a tent heater.
But if you end up going camping more often and in colder temps ( instead of staying home), you’ll get over it.
There’s no shame in using technology when it helps to get you OUT more often and in harsher conditions!
“Just In Case” Jack
P.s. Do you know where the closest nuclear bunker is from your home?
There are a lot of natural nuclear shelters in the US that are absolutely free. And one of them is near your home.
Click here to see the Closest Natural Nuclear Bunker to Your Home?
Click on the image above to find out where you need to take shelter.
The post 6 Best Tent Heaters To Make You A Winter Camping Hero appeared first on Skilled Survival.


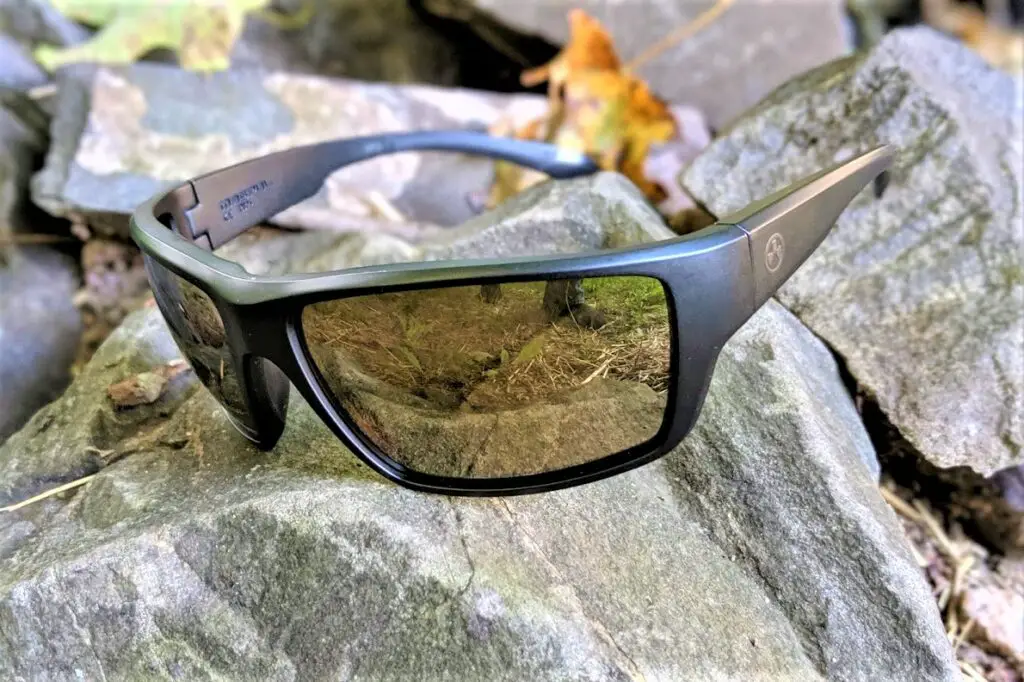 While you weren’t looking (or perhaps while your eyes were recovering from debris damage), sunglasses have quietly evolved from simple “shades” to keep the sun’s glare from your eyes into a full-on vision-enhancing system that offers protection of the ballistic and UV sorts. Lots of companies have popped up offering superior sunglasses, but recently, a small, rowdy, upstart company you’ve probably never heard of –
 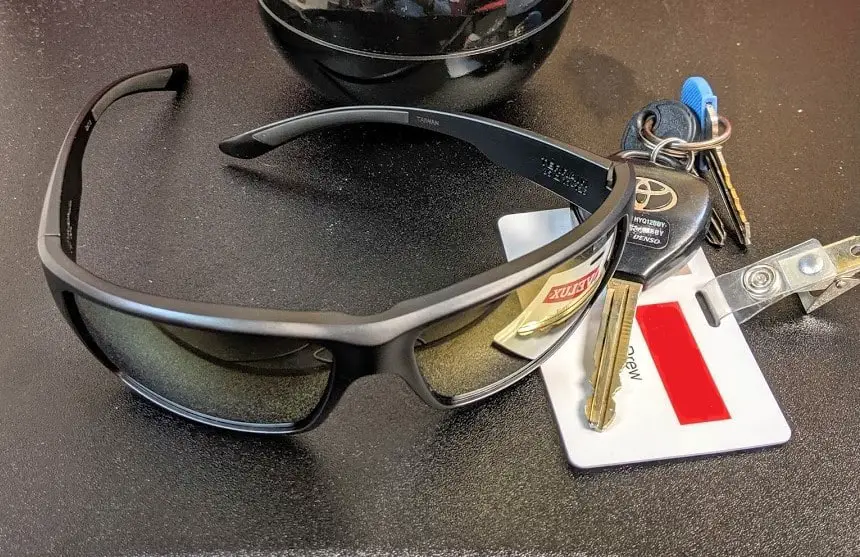 The entire Terrain glasses envelope meets not only the US civilian ANSI Z87+ high-impact standard test rating for safety, but also the military NATO standard MIL-PRF 32432 for ballistic protection of eyewear. These military standards mean that not only do the glasses pass tests for optical clarity, environmental stability (won’t expand/contract/quit working with temperature or moisture extremes), and UV ray protection, but the glasses also meet the protection requirements against a 0.15 caliber projectile travelling at 640-660 feet per second. As a frame of reference here – if Ralphie in A Christmas Story had been wearing Magpul Terrain sunglasses while fighting off Bad Bart’s wayward gang, he wouldn’t have been reduced to a whiny casualty when his trusty Red Ryder 200-shot carbine ricocheted.
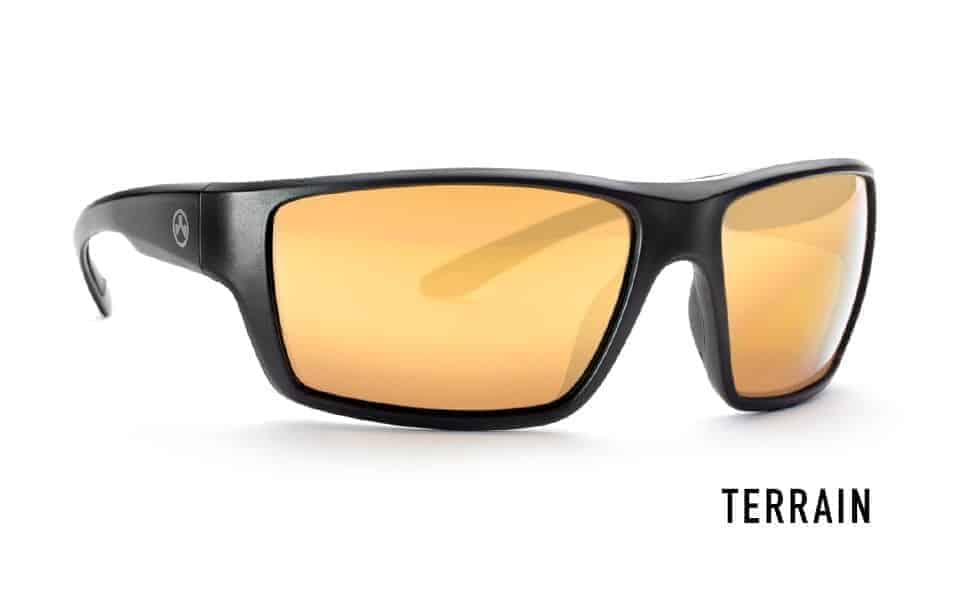
 The only day-to-day weirdness I experienced with the Terrains was due to the polarized lenses – and it is a malady any sunglasses with polarized lenses will suffer. Using a cellphone with the
  Wrapping it Up

![Hawke's Green Beret Survival Manual : Essential Strategies For: Shelter and Water, Food and Fire, Tools and Medicine, Navigation and Signaling, Surviva (Paperback)--by Mykel Hawke [2012 Edition]](http://survivallife.com/wp-content/plugins/aawp/public/image.php?url=aHR0cHM6Ly9pbWFnZXMtbmEuc3NsLWltYWdlcy1hbWF6b24uY29tL2ltYWdlcy9JLzQxaEolMkJuLThEd0wuanBn)


 Road flares are a safety device FEW people own and it’s a shame.
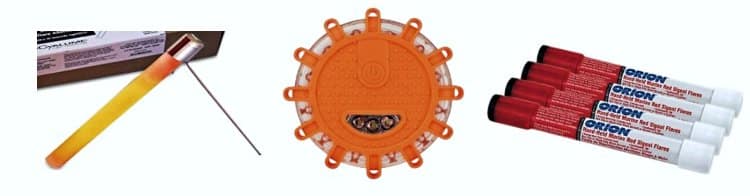 DIFFERENT KINDS OF ROAD FLARES
 HOW TO USE ROAD FLARES IN AN EMERGENCY