Written by R. Ann Parris on The Prepper Journal.
There are all kinds of ways windshield reflectors and space blankets can make life easier and increase our capabilities as preppers, both everyday and during emergencies. Some of the camping and car uses are the most well known, but they don’t get applied in our homes and backyards much.
What we’re doing with them affects just how much quality we need, and thus what we might expect to spend. We also have other options such as regular ol’ aluminum foil and the option of snagging aluminum bubble insulation.

Mylar Sheets
I should say up front that while I have a couple of the dollar-store wallet-sized sheets in my daily bags and vehicle, I am not a huge fan of them. I’ve tried them out a few times. They never got top billing for my vest or pocket stuff when I was camping.
We can get better versions of simple, thin, super-compact, super-lightweight heat sheets for not much more, which is now my choice.


We can also get the types where the mylar sheet is mated to a much sturdier nylon or canvas backing, complete with grommets. They’re pricier and have added bulk, but they’re far more sturdy with more ease of use.
That’s what I tend to go with now for away-from-home emergency kits when the space isn’t of issue.
I have always lived in areas where wind is a factor, even in the woods. Most of my packing and long-distance solo driving has been done in areas with crazy-vicious thorns and-or thick brush. I have had all kinds of things punctured and ripped from rocks, sticks, and mesquite. I also almost always have dogs with me, and do not always have a file for their nails or control of their wagging tails.


Thin, flimsy space blankets just don’t fit my outdoors emergency needs.
I also find them to be a serious pain to fold up, a pain to work with due to the light weight, and insanely noisy.
Others do like the regular ol’ dollar-store versions, express no real issues with them, and make them work in all kinds of conditions. For $1-$3, give them a try and see if they work for you.

There’s also all kinds of emergencies – and all kinds of uses in everyday life. We don’t always need a rough-ready Mylar sheet to reap the benefits.
There’s no reason to spend more in those cases, some of which apply to the uses below.
There’s no reason to spend more than we have to, ever – watch for seasonal sales and check outlets like Ollie’s and Big Lots, clip some coupons for Academy and Tractor Supply, and keep more of the budget available for other things even when we’re after the heftier emergency blankets or vehicle sun shades.

Windshield Reflectors
These are my backpacking, evac kit, and kayaking go-to choice. I typically carry 2-3, bundled so they form a belt pad and pad the back of my pack.
I started carrying just one to serve as a bedroll pad. Just like they reflect heat away from our cars, under our bodies, they reflect our heat back up. In a pinch, they can work solo as a ground cover, but I usually have a ground cloth of some kind.
I punch some holes and add loops so they’re easy to attach up over or beside my body as well, regardless of bivy or tarp shelter type. If I have sufficient insulation from the ground, that reflection is more useful to me.

That reflective value can be netted with any of the mylar and mylar-lined options. I still use the vehicle heat shields under a bedroll just because they’re less likely to bunch up or move, and they’re thicker, covering my pad needs.
I also prefer those fold-up vehicle pads for wet and snowy packing and kayaking because they can provide a comfy place to sit or kneel, and because it’s easier to rig them with some branches, around trees, or with line to reflect a fire’s heat back at my sitting and sleeping area.

There’s another big bonus when it comes to the vehicle reflectors over thinner sheets and plastic-tarp types: sparks.
I have never managed to actually have a sheet blow into a fire and melt immediately, but I have every once in a while had a gust hit a 1-sided or 2-sided/angled reflector fire just right, at just the right time, to send some embers blowing.
The vehicle sheets have never caught or had holes melted from just incidental sparks. The space blankets, however, have.
It’s just something to be aware of.
*Reflectors for fires aren’t just about keeping us warmer. Set up logs, rocks, spare lids, etc., to help food cook faster, even if you don’t set up a large section, or look into a reflector oven.


Creating a smaller space and reflective surfaces can also help make our at-home emergency candle and oil ovens and stoves more effective, decreasing cooking time. Likewise, heat shields and reflectors can help keep heat contained to a cooking area for poorly insulated campers, shacks, and trailers even with gas or electric cook-tops.
Reflect Heat At Home, Too
We can throw cheap sheets or sturdier windshield screens all over to help lower fuel use and make areas more comfortable. They work under the bottom sheet or the mattress for beds, humans or pets.
We can use them propped up behind animal beds as well. Windshield reflectors or sheets adhered to plywood or shipping pallets can be used for livestock, too, lowering the times we use heat lamps for birds and lambs.
We can also use them atop kennels or hanging from rafters to create canopy beds for our animals, holding and reflecting more warmth yet just as they do for us.


Mylar sheets (or aluminum bubble insulation) also work to reflect heat from behind our chairs and lining our workshops, near our wood stoves, on attic floors, and even on our windows.
Covering windows to reflect heat back works even better if we go with double-ply sheeting with something dark on the outside to absorb solar radiation, and the mylar on the inside.
Just like those sunscreens help keep vehicles cooler, we can use them during summer outages to reflect light away – just like switching to pale-colored curtains.
It applies to RVs and hunting shacks as well, or to tents that have windows and dark colors and car/truck camping.


If we have the sturdier versions, we can use hooks and line or poles to angle the screens out away from our windows so we can cut the light and heat, but still retain some airflow.
Outdoors Light & Heat Control
Any of our reflectors can help us with comfort and efficiency outside, too. With the reflective surface above, heat from the ground is contained and reflected back down, giving us extended use of our decks and porches, protecting gardens from cool snaps, or helping to retain warmth from any passive or active heating we use.
Especially during the spring-autumn verges and during winter when the sun’s arc is still low, we’re not losing significant amounts of light if we use tall hoop frames.


Other times, we might lay reflective ground cover or our handy alternatives to reflect light upwards, or prop any of our options against the back of a greenhouse or bed to reflect more light still from the sides.
Other times, we specifically want to lower the amount of sunlight reaching our gardens, and might even angle a screen so it’s blocking the whole afternoon sun.
Doing so – and adding a reflector facing outward instead – can lower the heat for cooler-weather crops and reduce evaporation and transpiration, reducing our need to irrigate in dry seasons.


We can also make use of our light and heat reflectors for indoor plants. It’s especially helpful starting seeds in low light conditions, whether that’s a window in early spring or “just” maximizing growth for countertop sprouts and microgreens.
It also allows us to maximize the efficiency of any grow lights we use – for birds as well as plants.


Smaller Structures
Whatever type we might choose – to include those cheap Mylar sheets or regular ol’ foil – we can use reflectors to increase the effectiveness of solar panels large and small-tiny, and solar heaters and dehydrators. They’re also handy for solar-heated water systems, whether those are warming houses or greenhouses, or feeding into showers or pre-heated cooking and hand-washing stations.
Vehicle sunscreens can make for incredibly easy solar cookers, but they, too, can also be assembled using any of our options – there’s no need to spend more for the sturdier or larger sheets.


Reflectors: Worth A Couple Bucks
Whether we’re planning for everyday emergencies or a major End-of-Days event, having some options on hand to reflect heat one way or another can be a major assist. That assistance applies to normal life as well, allowing us to do more with less work or fuel expenditure. In some cases – like decreasing the use of heat lamps and space heaters – it can also reduce risks on the home front.
Given the relatively inexpensive investment required, it’s worth trying out the options and keeping a few on hand, at home, in vehicles, with emergency kits, but also for everyday trial-and-error testing and development.
Be Safe out there and be sure to check out The Prepper Journal Store and follow The Prepper Journal on Facebook!
The post Reflectors and Mylar: Home, Garden and On The Go appeared first on The Prepper Journal.


 The
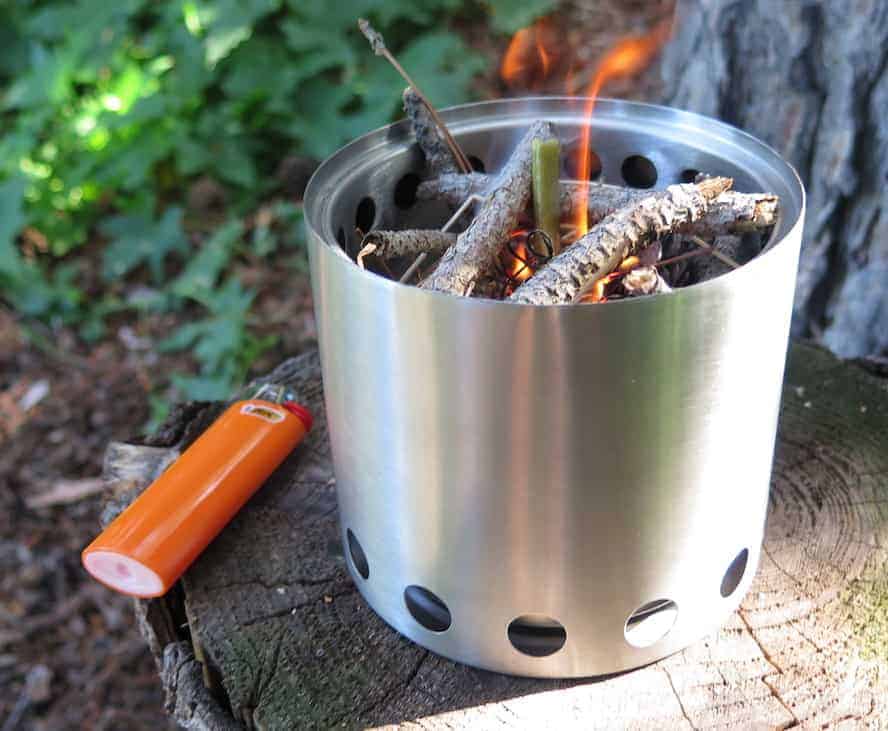
The  Air begins its journey under the main fire due to a wire grate that delineates the base of the burn chamber from a sub-chamber that doubles as an ash trap. As the combustion gasses ascent to the upper levels of the stove, they are heated before pouring into the chamber through the holes lining the upper reaches of the inside of the inner wall. The hot air offer an abundance of oxygen causing a gassification effect that takes the tradition campfire wood heating to amazing levels.
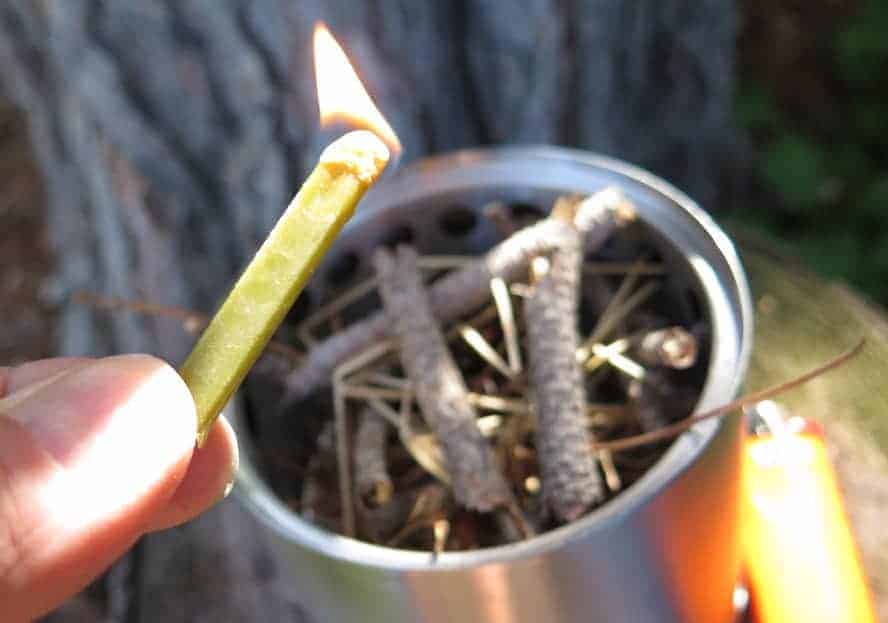 An additional benefit from the dual airflow system is that there is extremely little smoke from the stove when burning efficiently. Like none. Of course there is plenty of smoke on both ends of the time you use the stove, but a large part in the middle burn time when cooking and campfireing are done has no noticeable smoke. There is still plenty of woodfire smell, however. One time from a bit of a distance, I thought my stove was pouring out the smoke only to realize as I neared that it was spraying steam like a train whistle out of a snug fit pot lid. And no smoke.
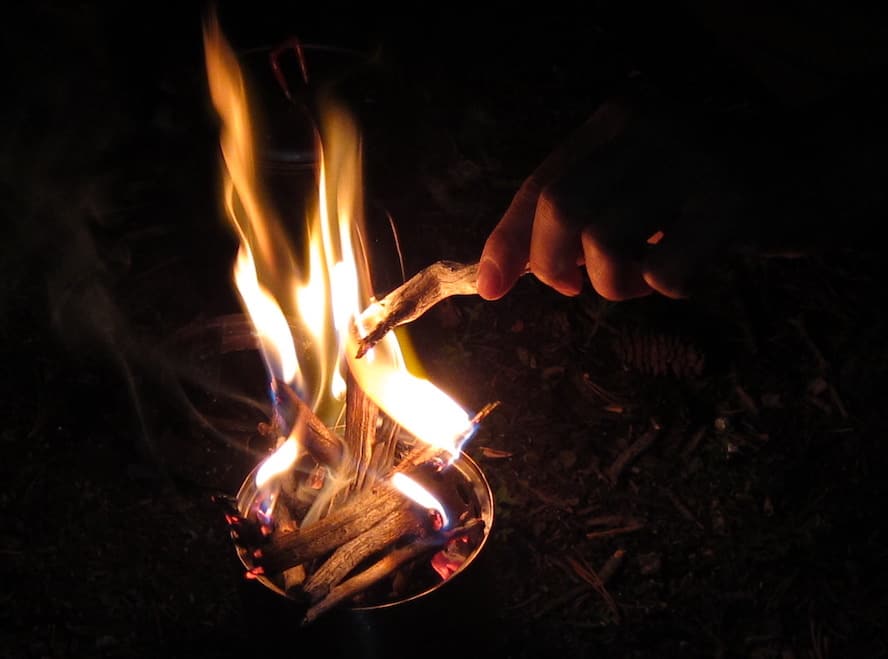 When burning wood, you don’t have to be diligent about the stove’s operation. You can add some wood and walk away. If it burns down, you add more. If your water boils, then good and it will just boil longer. But the Solo Stove completely removes the worry about conserving fuel. And once you get into the Solo Stove mindset, you see fuel everywhere and in abundance.
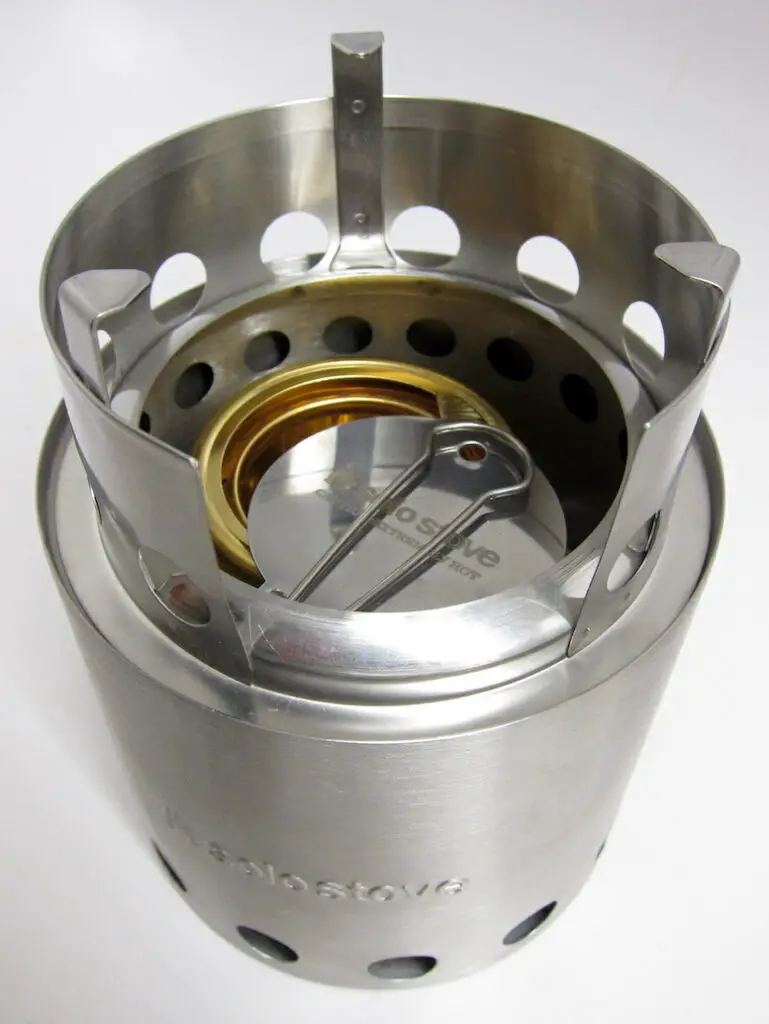 There are two pieces to the Solo Stove, a main dual container consisting of the two layers of steel, the ash basin, and plenty of holes above and below main chamber. The other piece is a ring of steel with a lip that can either dip into the main can for storage or fly above it as a pot support and doorway for adding more fuel to the combustion chamber.
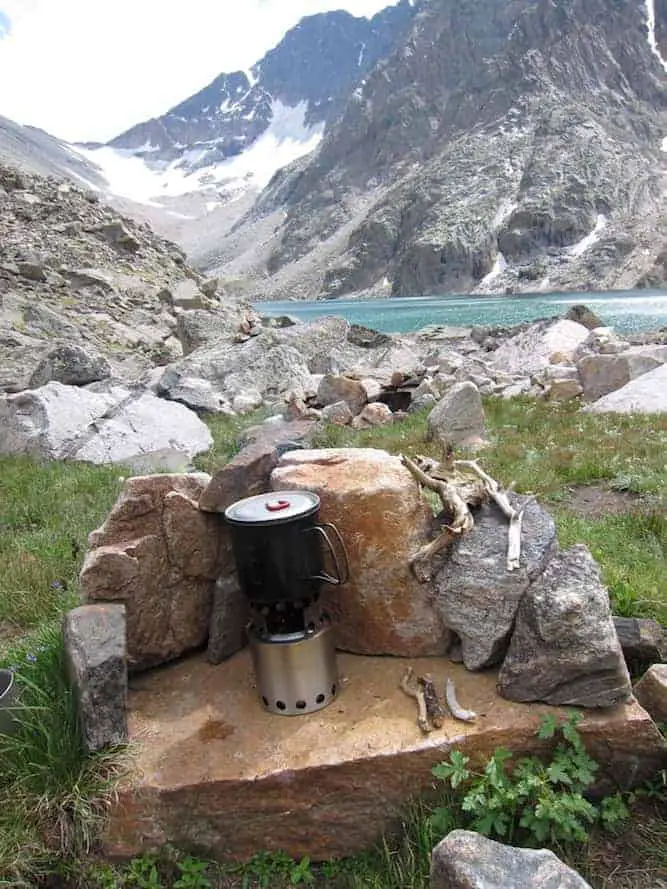 I’m not sure if it’s right or not, but I’ve extinguished my
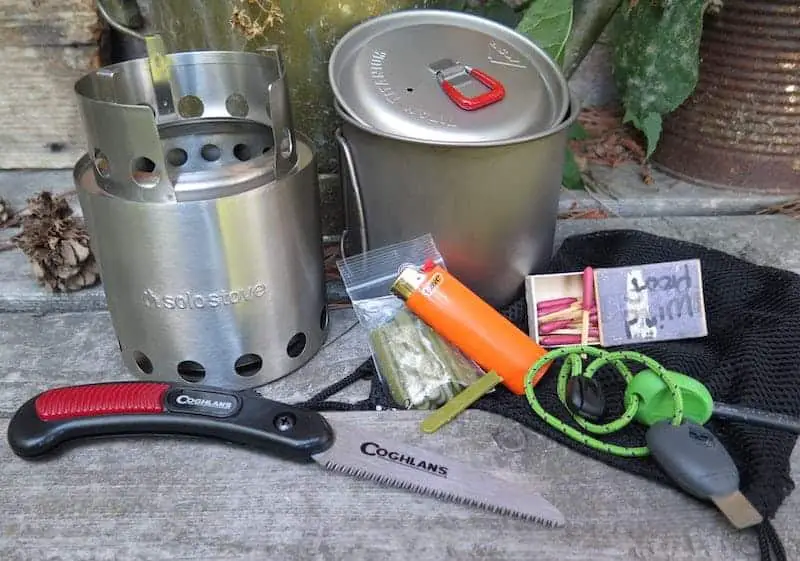
 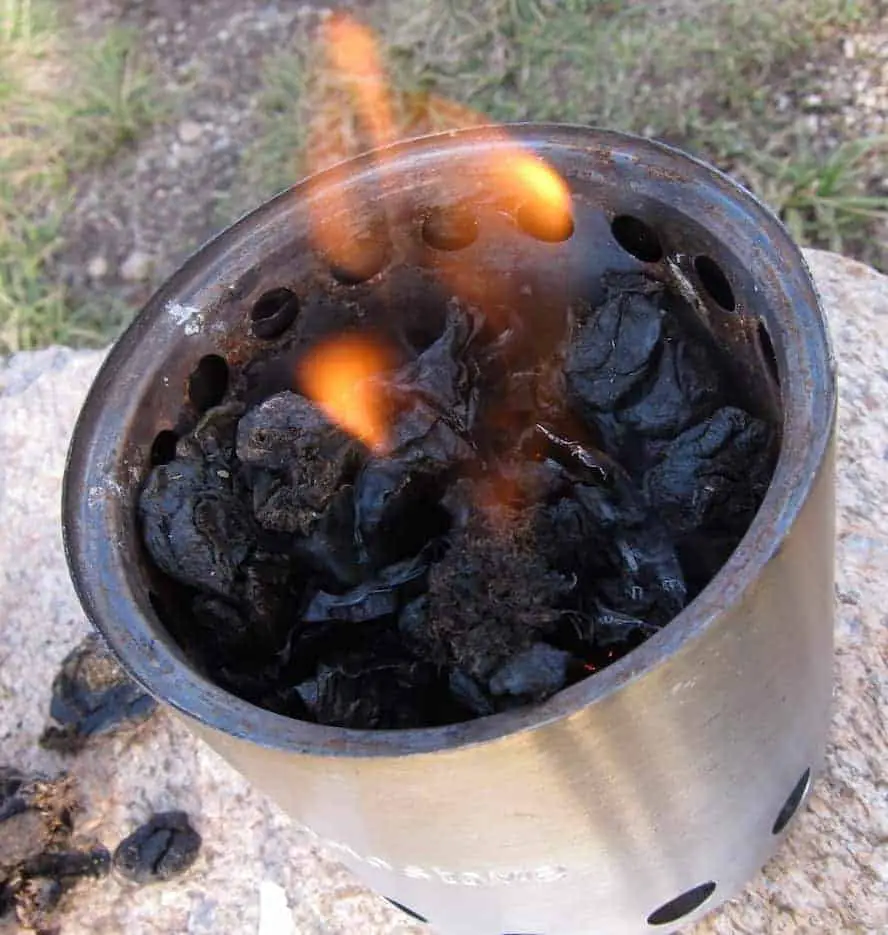 In use, I had a boiling quart of water in 10 minutes plus or minus. Usually plus. I used a commercial fire tinder to fire up the stove quickly, but you can use traditional tinder and firesticks to launch this rocket. Some of the benefits include no real concerns for fuel. The only time I ran into a fuel shortage was when I was over 11,000 feet in the
 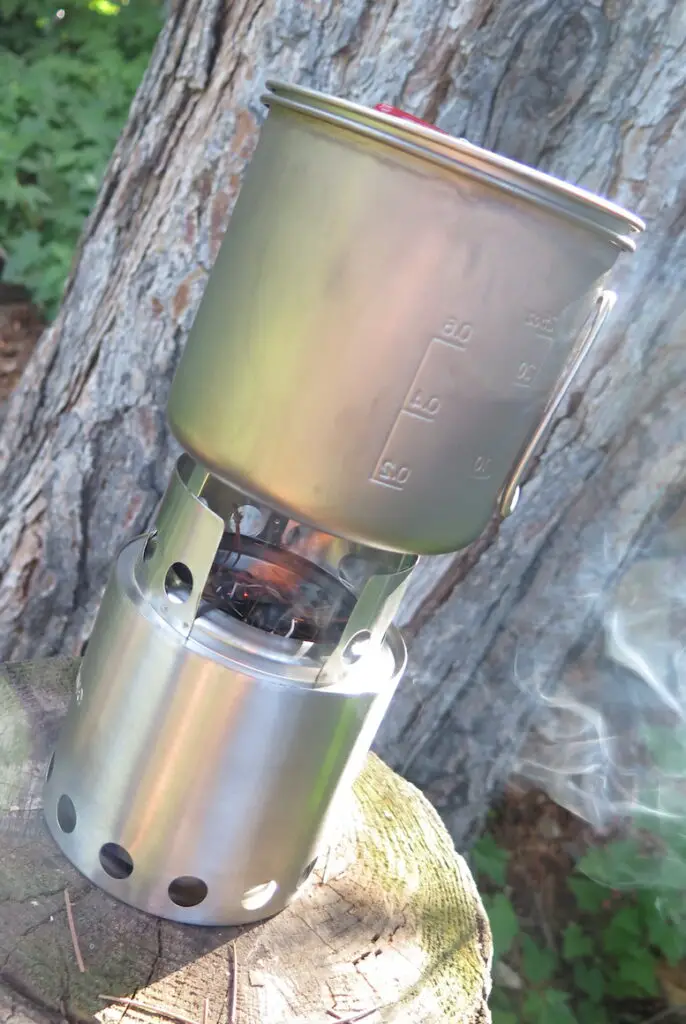 I have a 900 milliliter titanium pot and small fire making kit I carry with my Solo Stove Lite.


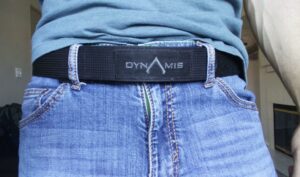 I’ve been on the search for the perfect belt for a long time. I have a
 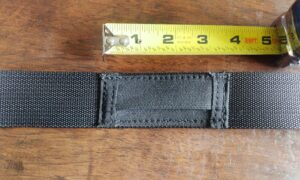 The two things that attracted me to this belt were the low-profile design, and the ability to hide things in the pockets, of which there are three. The first sits at the small of your back and is perfect for a spare key. This is my favorite pocket because it is top loading and easy to get into. The others are side loading and are very hard to get things in and out of. The key pocket is about 1-1/8” from top stitch to bottom stitch and is 3” long.
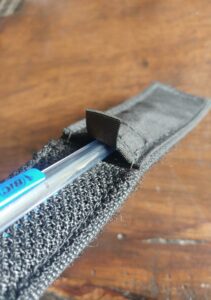 There are two other pockets at the front of the belt, where the buckle would be. They are right up against each other, end to end. They are the same size as the key pocket but configured differently. One is made of solid fabric with a Velcro closure on the side. The
  Here I keep a razor blade, About 30” of
 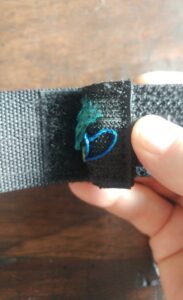 My complaints are few. The pockets can be difficult to get into, and harder to get things out of. If you put a handcuff key into one of the side loading pockets, you will never get it out. Unless you take the belt off, use needle nose pliers, and get lucky, its staying in there. For items like this, you have to devise some kind of pull tab system. I suspect the pockets would be slightly easier to get into with the 1.75” belt, but then I’ve had problems with belt loops and holsters at that size. Lastly, the belt material, Velcro, and pockets have made the belt bulky at the front. Loaded with a few items, the belt is still ½” to ¾” thick. For a lot of people this won’t be a problem, but for slimmer people in fitted shirts, you will have an odd looking “shelf” protruding from behind your shirt. If you have a belly, your shirts are not fitted, or you wear a flannel or other thicker material shirt, this is a non-issue. I think this could have been improved by distributing the pockets somewhere other than the front and sticking to the key pocket design instead of the side loading pocket. That’s my just two cents.
 Pros:
Pros: